HOW CAN I ACCESS ALL MY VMS USING ONE PUBLIC IP (NAT)?
So, you're looking at your resources and you see that you have only one floating IP. This makes you wonder, how can I possibly access my VMs with just one IP?
Rest assured, there is no sadistic intention from our part. This is a quite common problem with IPv4 addresses and as a matter of fact, your Internet provider has faced the same issue and the solution sits next to your telephone plug. That's right, your router.
This guide should cover the necessary steps to turn a VM with a public IP address into a router that can provide Internet access to all of your VMs.
You can find an index of the guide below. The basic sections are the instructions/configurations for your VMs, but we suggest you read the rest of the guide too, if this is your first time you encounter this subject.
Necessary background
In order to follow the rest of this guide, you first need to understand what the router in your home network does. Don't worry, we 'll try to make it as simple as possible. Fasten your seatbelts and here we go!
On the following picture, you can see a common home network setup.
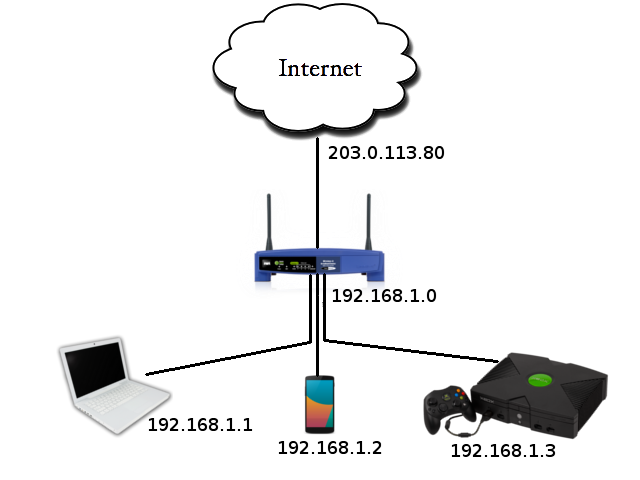
In your home setup, usually all your devices are connected to your router (192.168.1.0), forming a private network. Your router is also connected to the Internet, or public network, and is assigned a public IP by your Internet Provider (203.0.113.80).
Explanation of NAT
So, if your laptop wants to connect to http://example.com (93.184.216.119) it must construct a request like this:
From: 192.168.1.1,   Port: 12345
To: 93.184.216.119,  Port: 80
Since your laptop has no direct access to the Internet, it will ask your router (192.168.1.0) to forward the request to the Internet. This means that the laptop uses the router as a gateway.
The router's job doesn't end here though. After all, if the above request was forwarded as is, how would http://example.com respond? Keep in mind that the 192.168.1.1 address is valid only for your home network.
Instead, your router will replace 192.168.1.1 with its own public IP address (203.0.113.80). Also, it will replace 12345 with a random port of its own, e.g. 54321, which leads to the following altered request:
From: 203.0.113.80, Port: 54321
To: 93.184.216.119,  Port: 80
Now, what if your smartphone also wanted to connect to http://example.com? Easy, it would send the following request to the router:
From: 192.168.1.2,   Port: 9999
To: 93.184.216.119,  Port: 80
and the router would translate it to:
From: 203.0.113.80, Port: 6969
To: 93.184.216.119,  Port: 80
So, when http://example.com sends a reply to the router, you have two cases:
- The target port is 54321, so the router will forward the reply to your laptop.
- The target port is 6969, so the router will forward the reply to your smartphone.
This is possible because your router has stored a mapping of the laptop/phone {private IP address:port} and its own {public IP address:port}. This is called NAT (Network Address Translation) and the devices that reach the Internet through the router are commonly called NATed devices.
Explanation of port forwarding
Now that we have covered how your devices communicate with the outside world, let's see how you can do the opposite, e.g. reach your laptop's web server from somewhere out of your private network, say your friend's home. So, what would you do?
Well, you would open your browser and you would enter the IP address of your laptop (192.168.1.1). No, wait a second, you are at your friend's house, you can't use that address! Hm, how about your router's address (203.0.113.80)? Good thinking, but where would the router forward your request to? Your laptop, your charging phone, that guy across the street that steals your Internet?
No, in this scenario you need to use a technique called port forwarding. So, before you go to your friend's house, you should have instructed your router to do the following:
- Reserve a router port, e.g. 8080
- Forward any request that reaches this router port to your laptop (192.168.1.1) and its http port (80).
Had you done that, you could enter in the browser of your friend's laptop the following address:
203.0.113.80:8080
and enter your web server.
Next steps
Before you continue with the rest of the guide, you need to do the following:
- Create a private network and add all your VMs to it.
- Attach a floating IP to one of your VMs. That VM will be used as a router.
Next, you must decide on what you want to do.
- Do you want to connect to a VM that has no public IPv4 address via SSH?
- Do you want to provide Internet access to a VM that has no public IPv4 address?
- Do you want a combination of the above?
Most users would choose the latter, so what we suggest is:
- Configure NAT on your router VM.
- Enable port forwarding to all your NATed VMs. For example, if your NATed VMs
are two, (192.168.1.2 and 192.168.1.3),
you can use the following port forwarding scheme:
- Use router port 10022 to forward requests to 192.168.1.2 and port 22 (SSH).
- Use router port 13389 to forward requests to 192.168.1.3 and port 22 (SSH).
- Connect to your NATed VMs. If you have a Linux router, you can connect to each of your VMs using the ports you have specified during port forwarding (or you can just as well use the console).
- Apply the necessary configurations to all your NATed VMs .
Router instructions for Linux VMs
For this section, we have used the following example setup:
- eth0 is the public network card.
- eth1 is the private network card.
- 192.168.1.2:22 is the private IP (192.168.1.2) and port (22) of the NATed machine you want to connect to.
- 1134 is the port of the router VM that will forward requests to the above destination.
You must replace the above in the following commands according to your
setup. Also, the following commands assume that you are the root user of the
machine.
NAT
Use the following commands to enable NAT:
echo "1" > /proc/sys/net/ipv4/ip_forward
iptables -F
iptables -t nat -F
iptables -t nat -A POSTROUTING -o eth0 -j MASQUERADE
Port forwarding
If you want to connect through your router VM to a specific port of a NATed machine, use the following commands:
iptables -t nat -A POSTROUTING -o eth1 -j MASQUERADE
iptables -t nat -A PREROUTING -p tcp --dport 1134 -j DNAT \
--to-destination 192.168.2.1:22
You should now be able to connect to your NATed VM (192.168.2.1 in this case) using your router's public IP address and the specified port (1134 in this case)
Note: To make IP forwarding permanent, you can check this IP forwarding article. Also, to make IP tables persistent, i.e. not get lost after a reboot, you can check this iptables article.
Configuration for NATed VMs
A NATed VM needs to know only the private IP address of the router VM, for example 192.168.1.1.
We suggest you use your terminal and add a default gateway:
route add default gw 192.168.1.1
Once you have configured a default gateway, your VM can have Internet access through your router VM.
Performance concerns
You must keep in mind that using a VM to route the traffic for your private network puts a lot of strain to it and will have the following effects:
- Increase your network latency.
- Increase the load in your router VM.
Having said that, for regular SSH sessions or for a light web server, you should experience no issues.
CYCLADES USER GUIDE
- How to create a VM?
- How do I connect to a VM?
- How do I manage my VM?
- How can I resize the CPU/RAM of an existing VM?
- How can I attach/detach an IP on a running VM?
- How can I add extra disks to my VMs?
- How can I detach an extra disk from a VM?
- How can I add tags to my VMs?
- How can I assign my VM to a project?
- What are SSH keys and how can I use them?
- What are private networks?
- What is a firewall and which one should I choose?
- How can I access all my VMs using one public IP (NAT)?
- How can I add IPv6 nameservers on my CentOS/Oracle Linux VM?